Apache Tomcat Allow Directory Browsing With File Upload Example
This article is meant for advanced programmers who is interested to know more about Tomcat; or using Tomcat for production. For novices, read "How to Install and Go Started with Tomcat".
The authoritative source of data on Tomcat is the Tomcat's documentation, available under Tomcat's "webapps\docs" directory. You may also refer to the Java Servlet, JSP and JSF specifications, as Tomcat is the Reference Implementation for these technologies.
I shall assume that Tomcat is installed in d:\myproject\tomcat, and shall denote this directory as <TOMCAT_HOME> or <CATALINA_HOME> - "Catalina" is the codename for Tomcat 5 and above.
Tomcat Architecture and Configuration
Tomcat'due south Installed Directory Construction
Tomcat installation provides these directories:
- bin: for Tomcat's binaries and startup scripts.
- conf: global configuration applicative to all the webapps. The default installation provides:
- I Policy File:
catalina.policyfor specifying security policy. - 2 Properties Files:
catalina.propertiesandlogging.backdrop, - Four Configuration XML Files:
server.xml(Tomcat main configuration file),web.xml(global spider web application deployment descriptors),context.xml(global Tomcat-specific configuration options) andtomcat-users.xml(a database of user, countersign and part for authentication and access command).
confalso contain a sub-directory for each engine, e.grand.,Catalina, which in plow contains a sub-sub-directory for each of its hosts, eastward.grand.,localhost. You tin place the host-specific context data (similar tocontext.xml, but named aswebapp.xmlfor each webapp under the host). - I Policy File:
- lib: Keeps the JAR-file that are available to all webapps. The default installation include
servlet-api.jar(Servlet),jasper.jar(JSP) andjasper-el.jar(EL). Y'all may also go along the JAR files of external package here, such equally MySQL JDBC driver (mysql-connector-java-five.i.{20}-bin.jar) and JSTL (jstl.jarandstandard.jar). - logs: contains the engine logfile
Catalina.{yyyy-mm-dd}.log, host logfilelocalhost.{yyyy-mm-dd}.log, and other application logfiles such asmangerandhost-manager. The access log (created past theAccessLogValve) is also kept here. - webapps: the default
appBase- web applications base of operations directory of the hostlocalhost. - work: contains the translated servlet source files and classes of JSP/JSF. Organized in hierarchy of engine name (
Catalina), host name (localhost), webapp name, followed by the Java classes package structure. - temp: temporary files.
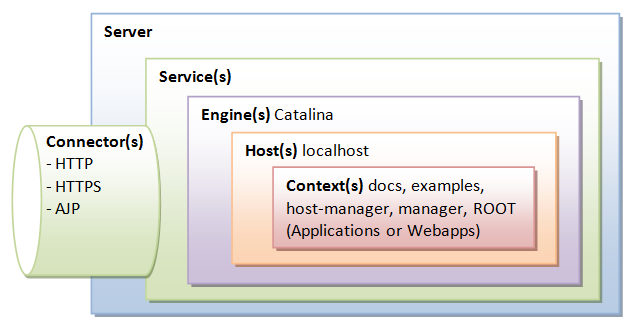
Tomcat Architecture
Tomcat is an HTTP server. Tomcat is also a servlet container that tin execute Coffee Servlet, and converting JavaServer Pages (JSP) and JavaServerFaces (JSF) to Java Servlet. Tomcat employs a hierarchical and modular architecture as illustrated:
Chief Configuration File "server.xml"
Tomcat's main configuration file is the "server.xml", kept under the <CATALINA_HOME>\conf directory. The default "server.xml" is reproduced equally follows (afterwards removing the comments and minor touch-ups):
1 2 3 4 5 6 7 8 ix ten 11 12 13 14 15 16 17 18 xix 20 21 22 23 24 25 26 27 28 29 30 31 32 33 34 35 36 37 38 | <?xml version='one.0' encoding='utf-8'?> <Server port="8005" shutdown="SHUTDOWN"> <Listener className="org.apache.catalina.core.JasperListener" /> <Listener className="org.apache.catalina.core.AprLifecycleListener" SSLEngine="on" /> <Listener className="org.apache.catalina.core.JreMemoryLeakPreventionListener" /> <Listener className="org.apache.catalina.mbeans.GlobalResourcesLifecycleListener" /> <Listener className="org.apache.catalina.core.ThreadLocalLeakPreventionListener" /> <GlobalNamingResources> <Resource proper noun="UserDatabase" auth="Container" type="org.apache.catalina.UserDatabase" clarification="User database that tin be updated and saved" factory="org.apache.catalina.users.MemoryUserDatabaseFactory" pathname="conf/tomcat-users.xml" /> </GlobalNamingResources> <Service proper noun="Catalina"> <Connector port="8080" protocol="HTTP/one.1" connectionTimeout="20000" redirectPort="8443" /> <Connector port="8009" protocol="AJP/1.iii" redirectPort="8443" /> <Engine name="Catalina" defaultHost="localhost"> <Realm className="org.apache.catalina.realm.LockOutRealm"> <Realm className="org.apache.catalina.realm.UserDatabaseRealm" resourceName="UserDatabase"/> </Realm> <Host proper noun="localhost" appBase="webapps" unpackWARs="truthful" autoDeploy="true"> <Valve className="org.apache.catalina.valves.AccessLogValve" directory="logs" prefix="localhost_access_log." suffix=".txt" pattern="%h %50 %u %t "%r" %south %b" /> </Host> </Engine> </Service> </Server> |
Server
Server (Line 2) is top component, representing an instance of Tomcat.Information technology tin contains one or more Services, each with its ain Engines and Connectors.
<Server port="8005" shutdown="SHUTDOWN"> ...... </Server>
Listeners
The Server contains several Listeners (Lines 3-7). A Listener listens and responses to specific events.
- The
JasperListenerenables theJasperJSP engine, and is responsible for re-compiling the JSP pages that have been updated.<Listener className="org.apache.catalina.core.JasperListener" />
- The
GlobalResourcesLifecycleListenerenables the global resources, and makes possible the apply of JNDI for accessing resource such equally databases.<Listener className="org.apache.catalina.mbeans.GlobalResourcesLifecycleListener" />
Global Naming Resources
The <GlobalNamingResources> chemical element (Line nine-15) defines the JNDI (Coffee Naming and Directory Interface) resources, that allows Java software clients to discover and expect up data and objects via a name.
The default configuration defines a JNDI name called UserDatabase via the <Resource> element (Line 10-fourteen), which is a memory-based database for user authentication loaded from "conf/tomcat-users.xml".
<GlobalNamingResources> <Resources proper name="UserDatabase" auth="Container" type="org.apache.catalina.UserDatabase" description="User database that can be updated and saved" manufacturing plant="org.apache.catalina.users.MemoryUserDatabaseFactory" pathname="conf/tomcat-users.xml" /> </GlobalNamingResources>
You tin can ascertain other global resource JNDI such as MySQL database to implement connexion pooling.
Services
A Service associates 1 or more Connectors to a Engine. The default configuration defines a Service called "Catalina", and associates two Connectors: HTTP and AJP to the Engine.
<Service name="Catalina"> ...... </Service>
Connectors
A Connector is associated with a TCP port to handle communications betwixt the Service and the clients. The default configuration defines two Connectors:
- HTTP/1.ane: Handle HTTP communication and enable Tomcat to be an HTTP server. Clients can issue HTTP requests to the server via this
Connector, and receive the HTTP response messages.<Connector port="8080" protocol="HTTP/1.1" connectionTimeout="20000" redirectPort="8443" />
The default chooses TCP port 8080 to run the Tomcat HTTP server, which is unlike from the default port number of 80 for HTTP production server. You tin can choose any number between 1024 to 65535, which is not used by any application, to run your Tomcat server.
TheconnectionTimeoutattribute define the number of milliseconds thisconnectorvolition wait, after accepting a connection, for the request URI line (request message) to be presented. The default is xx seconds.
Theredirectattribute re-directs the SSL requests to TCP port 8443. - AJP/one.3: Apache JServ Protocol
connectorto handle advice between Tomcat server and Apache HTTP server.<Connector port="8009" protocol="AJP/1.3" redirectPort="8443" />
You could run Tomcat and Apache HTTP servers together, and allow the Apache HTTP server handles static requests and PHP; while Tomcat server handles the Java Servlet/JSP. Read "How To Configure Tomcat to work with Apache".
Containers
Tomcat refers to Engine, Host, Context, and Cluster, every bit container. The highest-level is Engine; while the lowest-level is Context. Sure components, such as Realm and Valve, can be placed in a container.
Engine
A Engine is the highest-level of a container. It tin contains one or more Hosts. Yous could configure a Tomcat server to run on several hostnames, known as virtual host.
<Engine name="Catalina" defaultHost="localhost">
The Catalina Engine receives HTTP requests from the HTTP connector, and directly them to the correct host based on the hostname/IP address in the request header.
Realm
A Realm is a database of user, password, and office for hallmark (i.east., access control). You tin ascertain Realm for whatever container, such as Engine, Host, and Context, and Cluster.
<Realm className="org.apache.catalina.realm.LockOutRealm"> <Realm className="org.apache.catalina.realm.UserDatabaseRealm" resourceName="UserDatabase"/> </Realm>
The default configuration defines a Realm (UserDatabaseRealm) for the Catalina Engine, to perform user authentication for accessing this engine. It uses the JNDI name UserDatabase defined in the GlobalNamingResources.
Also the UserDatabaseRealm, there are: JDBCRealm (for authenticating users to connect to a relational database via the JDBC driver); DataSourceRealm (to connect to a DataSource via JNDI; JNDIRealm (to connect to an LDAP directory); and MemoryRealm (to load an XML file in retentivity).
Hosts
A Host defines a virtual host nether the Engine, which can in turn support many Contexts (webapps).
<Host name="localhost" appBase="webapps" unpackWARs="true" autoDeploy="true">
The default configuration define one host called localhost. The appBase attribute defines the base directory of all the webapps, in this case, <CATALINA_HOME>\webapps. By default, each webapp's URL is the same as its directory name. For example, the default Tomcat installation provides four webapps: docs, examples, host-manager and manager nether the webapps directory. The only exception is ROOT, which is identified past an empty string. That is, its URL is http://localhost:8080/.
The unpackWARs specifies whether WAR-file dropped into the webapps directory shall be unzipped. For unpackWARs="false", Tomcat will run the application from the WAR-file directly, without unpacking, which could mean slower execution.
The autoDeploy attribute specifies whether to deploy awarding dropped into the webapps directory automatically.
Cluster
Tomcat supports server clustering. It tin replicate sessions and context attributes across the clustered server. Information technology can too deploy a War-file on all the cluster.
Valve
A Valve can intercept HTTP requests before forwarding them to the applications, for pre-processing the requests. A Valve can be divers for any container, such as Engine, Host, and Context, and Cluster.
In the default configuration, the AccessLogValve intercepts an HTTP asking and creates a log entry in the log file, as follows:
<Valve className="org.apache.catalina.valves.AccessLogValve" directory="logs" prefix="localhost_access_log." suffix=".txt" pattern="%h %l %u %t "%r" %s %b" />
Other valves include:
-
RemoteAddrValve: which blocks requests from certain IP addresses, -
RemoteHostValve: which blocks asking based on hostnames, -
RequestDumperValve: which logs details of the requests, -
SingleSignOnValve: when placed under a<host>, allows single sign-on to admission all the webapp under the host.
Other Configuration Files: web.xml, context.xml, tomcat-users.xml
[TODO]
They are so many things that you can configured in Tomcat. I describe some of the configurations that I plant useful in this section.
Enabling Directory List
When the request URL refers to a directory instead of a file, e.g., http://host:port/hello/, you tin configure Tomcat to serve the directory listing, or a welcome file, or effect mistake "404 Page Not Constitute". Enabling directory listing is handy for test server but NOT desire for production server (as it reveal the directory structure and expose the entire directory hierarchy).
Enabling Directory Listing for ALL Webapps
To enable directory listing for all the web applications, yous could modify the <CATALINA_HOME>\conf\web.xml, by changing "listings" from "false" to "truthful" for the "default" servlet, as follows:
<servlet> <servlet-proper noun>default</servlet-name> <servlet-class>org.apache.catalina.servlets.DefaultServlet</servlet-form> <init-param> <param-proper name>debug</param-name> <param-value>0</param-value> </init-param> <init-param> <param-proper noun>listings</param-proper name> <param-value> true </param-value> </init-param> <load-on-startup>i</load-on-startup> </servlet> <servlet-mapping> <servlet-name>default</servlet-name> <url-pattern>/</url-pattern> </servlet-mapping> <welcome-file-listing> <welcome-file>index.html</welcome-file> <welcome-file>index.htm</welcome-file> <welcome-file>index.jsp</welcome-file> </welcome-file-list> The above configuration maps URL "\" (root directory of the spider web context) (in <url-pattern>) to Java class DefaultServlet (in <servlet-class>) via the common servlet name of default (in <servlet-proper name>). We enable directory list by changing the servlet'due south initialization parameter listings to true.
If a user requests for a directory, and the directory listing is enabled and information technology contains one of the files in the <welcome-file> list, the welcome file will be served; otherwise, the directory listing will be served. On the other hand, if a directory asking is received and the directory listing is not enabled, the server returns an mistake "404 Folio Not Found".
Enabling Directory Listing for a item Webapp
If you wish to allow directory listing of a item web application just, you could disable the directory listing in "<CATALINA_HOME>\conf\web.xml" globally, and define the following <servlet> and <servlet-mapping> in your application-specific Web-INF\web.xml, as follows. You need to use another <servlet-name> in place of DefaultServlet.
<servlet> <servlet-proper name>DirectoryListing</servlet-name> <servlet-class>org.apache.catalina.servlets.DefaultServlet</servlet-class> <init-param> <param-name>debug</param-proper name> <param-value>0</param-value> </init-param> <init-param> <param-name>listings</param-proper name> <param-value>truthful</param-value> </init-param> </servlet> <servlet-mapping> <servlet-proper noun>DirectoryListing</servlet-proper noun> <url-pattern>/</url-pattern> </servlet-mapping>
Automatic Servlet Reload
To enable automated servlet reload (whenever a servlet is re-compiled), you need to specify <Context reloadable="true">...</Context>, in "<CATALINA_HOME>\conf\context.xml" for all web applications, or the <Context> chemical element in "<CATALINA_HOME>\conf\server.xml" for a particular web application.
The following letters announced on the Tomcat'southward console if you re-compile a servlet:
30 X, XXXX XX:XX:Xx Twenty org.apache.catalina.core.StandardContext reload INFO: Reloading Context with path [/hello] has started Xxx X, XXXX XX:XX:20 XX org.apache.catalina.core.StandardContext reload INFO: Reloading Context with path [/how-do-you-do] is completed
Enabling automated servlet reload is handy during awarding evolution, but it requires significant runtime overhead to mind to the changes, and is not recommended for product systems. Instead, you could use the "manager" to trigger reloads on demand.
Setting the Context Root Directory and Asking URL of a Webapp
A server could run many web applications. A webapp is also chosen a web context. The context root (or document base directory) refers to the base directory of a webapp. They are a few ways to configure a context root and its request URL of a webapp:
- (RECOMMENDED) Create a directory under
<CATALINA_HOME>\webappsfor your webapp. A context will exist created with request URL set to the name of the directory. For example, if yous create a directory called "howdy" under Tomcat's "webapps". This application tin be accessed by web users via URLhttp://host:port/hello.
To change the request URL of the webapp, create a "context.xml" configuration file, every bit follows, and place information technology nether "ContextRoot\META-INF":<Context path="/yourURLPath" />
- Alternatively, you lot tin can write a
<Context>element in<CATALINA_HOME>\conf\server.xml, nether the<Host>element. You can specify both the URL and the base directory. For example,...... ...... </Host> </Engine> </Service> </Server>
In the above example, we define a web context with URL "/ws", with context root (docBaseor certificate base directory) at "d:\workshop". This application can exist accessed via URLhttp://host:port /ws.
Take note that:- The configuration creates a mapping from the "URL Path" issued by the web users to the "certificate base of operations directory" in the server's file system, where you store your webapp resources.
- Place the
<Context>chemical element before the catastrophe tag of the<Host>element. - Use Unix-style forwards slash
'/'every bit the directory separator in the configuration file, instead of Window-mode back slash'\'. - The attribute
reloadable="true"asks Tomcat to monitor your servlets for changes, and automatically reload the servlets if changes is detected. This is handy for a development system, but inefficient in a production system.
- Write a configuration file with a
<Context>element and place it under Tomcat'south "conf\Catalina\localhost". For example, suppose nosotros wish to create a webapp with URL "hello" in base directory "d:\myproject\myHello", create the following file "hi.xml":<?xml version="1.0" encoding="UTF-8"?> <Context docBase="D:\myproject\myHello" path="/how-do-you-do" />
Changing the Default "webapps" Directory
The default directory for deploying web applications is <CATALINA_HOME>\webapps. Yous could modify the default by modifying the configuration file "conf\server.xml" <Host> element's "appBase" attribute as follows:
<Host proper noun="localhost" appBase="webapps" unpackWARs="truthful" autoDeploy="true" xmlValidation="fake" xmlNamespaceAware="simulated"> ...... </host>
Deploying Webapps
A web context is a single web application (webapp). It is the lowest-level container, that you lot can define components such as Realm and Valve. By default, all webapps are kept under the <CATALINA_HOME>\webapps directory (as configured in the <host> element appBase attribute.
A Java webapp may contain many types of files, such as HTML, CSS, Scripts, images, JSP, servlet, utility classes, external library jar-files. A Java webapp must follow a strict directory construction every bit depicted in the Servlet/JSP specifications. This enables deployment in a Java-capable web server (such as Apache Tomcat and Glassfish). The resources must exist kept in the right directories and sub-directories.
The URL of a webapp, by default, is the same as the base directory name (or context root) of the webapp.
Webapp's Directory Structure
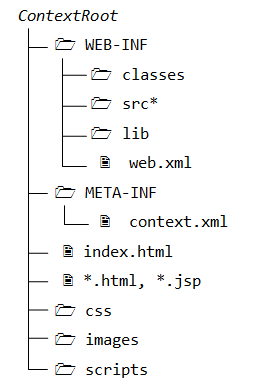
The directory construction of a webapp is as follows:
- "
ContextRoot": contains the resources that are visible and accessible by the web clients, such equally HTML, CSS, Scripts and images. These resources will be delivered to the clients as information technology is. You could create sub-directories such every bitimages,cssandscripts, to further categories the diverse resources. - "
ContextRoot\WEB-INF": This directory, although under the context root, is Not visible to the web users. In other words, information technology is Non attainable by the clients directly (for security reason). This is where y'all keep your application-specific configuration files such as "spider web.xml". It's sub-directories contain program classes, source files, and libraries. - "
ContextRoot\Web-INF\src": Keeps the Java plan source files. It is optional but a expert practice to separate the source files and classes to facilitate deployment. - "
ContextRoot\WEB-INF\classes": Keeps the Java classes (compiled from the source codes). Classes defined in packages must exist kept co-ordinate to the Java package directory structure. - "
ContextRoot\WEB-INF\lib": Keeps the libraries (jar-files), which are provided by other packages, specific and bachelor to this webapp only. - "
ContextRoot\META-INF\": This is also a subconscious directory, to proceed resources and configurations (eastward.1000., "context.xml") related to the server. In contrast, "Spider web-INF" is for resources related to this web application, independent of the server.
Webapp-Specific Configuration Files
These are the configuration files specific to a webapp: (a) WEB-INF\spider web.xml; (b) META-INF\context.xml.
You tin can configure a webapp in many means: (a) Write a <context> element in server.xml under <Host> element, (b) contextRoot\META-INF\context.xml, and (c) conf\Catalina\localhost\webapp.xml, and (d) conf\context.xml. See "Setting the Context Root Directory and Asking URL of a Webapp".
Web Application Deployment Descriptors - "web.xml"
The "web.xml" contains the deployment descriptors. There are two sets of web.xml:
-
<CATALINA_HOME>\conf\web.xml: applicable to ALL webapps. -
ContextRoot\WEB-INF\web.xml: applicable to the specific web context. Information technology overrides the global setting, if any.
The complete specification for "spider web.xml" can exist found in the "Java Servlet Specification" under "Deployment Descriptor".
A sample configuration of a servlet with most of its sub-elements is as follows:
<spider web-app ......> ...... <servlet> <icon> <small-icon>/images/icon.jpg</pocket-sized-icon> </icon> <servlet-name>MyServlat</servlet-name> <brandish-name>My Servlet Brandish Name</brandish-name> <clarification>My Testing Servlet long description</description> <servlet-class>MyServletClassname</servlet-grade> <init-param> <param-name>myParmName</param-name> <param-value>myParmValue</param-value> </init-param> <load-on-startup>25</load-on-startup> </servlet> ...... <servlet-mapping> <servlet-proper name>MyServlat</servlet-proper noun> <url-pattern>/sayhello</url-design> </servlet-mapping> ...... </web-app>
Deploying a Web Awarding in a War file
Y'all could use the JDK's jar utility to "zip" upward all the files of a web application to produce a so-called WAR (Spider web Application Annal) file for deployment, or distribution.
.... Change current directory to the web application's context root contextRoot> jar cvf test.war .
Drop the exam.state of war into <CATALINA_HOME>\webapps. A context chosen test volition exist created automatically. You can access the web application via URL http://host:port/test .
Tomcat really unpacks the examination.state of war into a "test" directory in <CATALINA_HOME>\webapps. Yous need to remove this directory, if you reload a new version.
Running Tomcat
Tomcat's Manager
References:
- "Tomcat Web Application Manager How To" @ "webapps/docs/html-manager-howto.html".
- "Tomcat Manager App How-To" @ "webapps/docs/manager-howto.html".
Tomcat "manager" webapp allows you lot to deploy a new web awarding; start, stop, reload or un-deploy an existing i, without having to shut down and restart the server, in a production environment.
To enable Tomcat'south manager, edit "<CATALINA_HOME>\conf\tomcat-users.xml " to include a office called "manager-gui" and a user with this role. You may too assign other roles, such as admin-gui for accessing the Tomcat "Host Manager".
<function rolename="director-gui" /> <role rolename="manager-condition" /> <role rolename="manager-script" /> <part rolename="manager-jmx" /> <function rolename="admin-gui" /> <office rolename="admin-script" /> <user username="mymanager" countersign="xxxx" roles="manager-gui, admin-gui"/>
To invoke manager web application, use http://localhost:8080/manager/html. You tin use Tomcat'southward managing director to:
- List all webapps.
- Start/Stop/Reload a item webapp.
- Deploy a new webapp remotely, and undeploy a webapp without restarting the container.
- Terminate (or Invalidate) sessions - a session has a pre-set up expiry time (east.yard., 30 sec).
- Analyze memory leaks.
- View JVM status and Server status.
Tomcat vii provides separate manager roles for the GUI (manager-gui), condition (manager-condition), scripting (manager-script) and JMX proxy (manager-jmx), defined in "webapps/manager/Spider web-INF/web.xml". This allows for fine-grained admission control to management tasks.
-
managing director-gui- Admission to the HTML "web" interface, via:http://{host}:{port}/manager/html -
managing director-status- Access to the "Server Status" page but, via:http://{host}:{port}/manager/condition -
manager-script- Access to the "manifestly-text" interface, and to the "Server Status" folio, via command in the class of:http://{host}:{port}/director/text/{command}?{parameters} http://{host}:{port}/manager/text/list http://{host}:{port}/director/text/deploy?path=/testapp -
manager-jmx- Admission to JMX proxy interface and to the "Server Status" page, via:http://{host}:{port}/manager/jmxproxy/?{command}={parameter}
For security reason, a user should NOT exist given more than than one of the following roles: manager-gui, director-script, and manager-jmx.
Tomcat'south "Administration Tool"
The Tomcat "Adminstrative Tool" (or "Ambassador Panel") has been removed since Tomcat vi. Utilise JMX manager instead.
Automatic Startup at Boot-time
(Windows) Running Tomcat as a Windows Service
You need to download the Windows-specific version of Tomcat (from Tomcat's download, cull 32-bit or 64-bit Windows' nix version, e.g., apache-tomcat-vii.0.{xx}-windows-x86.zip).
Read "Windows service How-To" in the Tomcat documentation (<CATALINA_HOME>\webapps\docs\windows-service-howto.html).
In a production environment, it is more convenient to run Tomcat as a service, so that information technology can start automatically whenever the arrangement is started (or re-start automatically afterward an unexpected interruption).
To install Tomcat equally a service, start a CMD vanquish (with administrator right) and run the <CATALINA_HOME>\bin\service.bat with install option:
<CATALINA_HOME>\bin> service install Installing the service 'Tomcat7' ... ...... The service 'Tomcat7' has been installed.
The Tomcat service chosen "Apache Tomcat 7" is installed and will start automatically whenever the system is started. Check the "Services" under "Control Panel" ⇒ "Authoritative Tools".
A GUI awarding called Tomcat7w is bachelor for monitoring and configuring Tomcat services. Launch Tomcat7w:
<CATALINA_HOME>\bin> Tomcat7w
You could put the Tomcat icon in the organization tray via the MS (Monitor Service) pick:
<CATALINA_HOME>\bin> Tomcat7w //MS//
You can first/stop the Tomcat service now via:
-
Tomcat7w; - "Control Panel" ⇒ "Administrator Tools" ⇒ "Services" ⇒ "Apache Tomcat 7" ⇒ "Beginning";
- From CMD beat, Effect "
net" control:prompt> net start tomcat7 The Apache Tomcat 7 service is starting.. The Apache Tomcat 7 service was started successfully. ...... ...... prompt> cyberspace stop tomcat7 The Apache Tomcat 7 service is stopping.. The Apache Tomcat 7 service was stopped successfully.
To uninstall Tomcat Service, run the <CATALINA_HOME>\bin\service.bat with remove option:
<CATALINA_HOME>\bin> service remove The service 'Tomcat7' has been removed
You can also use Microsoft Management Console (MMC) to manage the services: Go to "Get-go" ⇒ ⇒ Run ⇒ enter "services.msc".
A flip side of running Tomcat as a service is you need to read the mistake letters from <CATALINA_HOME>\logs instead of the Tomcat console.
(Linux and Mac Bone) Automatic Startup on Reboots
To commencement Tomcat automatically when the machine boots upward, you need to create a init script in /etc/init.d, e.1000., /etc/init.d/tomcat, as follows:
#!/bin/sh # Tomcat init script for Linux. # JAVA_HOME={path-to-java-installed-directory} CATALINA_HOME={path-to-Tomat-installed-directgory} export JAVA_HOME CATALINA_HOME exec $CATALINA_HOME/bin/catalina.sh $* Save the script as "tomcat" in /etc/init.d.
$ cd /etc/init.d $ sudo chown root.root tomcat $ sudo chmod 755 tomcat
You can start|end|restart Tomcat via:
$ service tomcat beginning|stop|restart
Tomcat's Startup Script
To beginning tomcat server, you could invoke the batch file "startup.bat" (for Windows) or "startup.sh" (for Linux/Mac) (in directory "<CATALINA_HOME>\bin", where <CATALINA_HOME> refers to the Tomcat installed directory). The "startup.bat|startup.sh" invokes "catalina.bat start|catalina.sh start".
Alternatively, you could call the "catalina.bat|catalina.sh" directly, which provides more options of starting Tomcat. Enter "catalina" to view the options:
<CATALINA_HOME>/bin> catalina Using CATALINA_BASE: D:\xxx\tomcat7.0.{xx} Using CATALINA_HOME: D:\xxx\tomcat7.0.{xx} Using CATALINA_TMPDIR: D:\xxx\tomcat7.0.{xx}\temp Using JRE_HOME: d:\xxx\jdk1.6 Usage: catalina ( commands ... ) commands: debug First Catalina in a debugger debug -security Debug Catalina with a security managing director jpda start Start Catalina under JPDA debugger run Start Catalina in the current window run -security Start in the current window with security director start Offset Catalina in a split window commencement -security Start in a separate window with security director stop Stop Catalina configtest Run a basic syntax check on server.xml version What version of tomcat are you lot running? Report the source codes of "catalina.bat|catalina.sh". Take note that the environs variable JAVA_HOME is needed in this script.
The other scripts provided are:
-
shutdown.bat|shutdown.sh: for shuting down the Tomcat server. -
configtest.bat|configtest.sh: for checking the configuration fileserver.xml, same every bit"catalina configtest". -
version.bat|version.sh: for displaying the versions, same as "catalina version". -
digest.bat|digest.sh: making password hash and encrypting countersign. - Internal used:
setclasspath.bat|setclasspath.sh,cpappend.bat(classpath append),tool-wrapper.bat|tool-wrapper.sh,daemon.sh.
Security
Realm and User Hallmark in Tomcat
References:
- "Realm Configuration HOW-TO" (@ "
<CATALINA_HOME>\webapps\docs\realm-howto.html"). - "Java EE 5 Tutorial", Part IV "Services", Chapters 28-xxx on Security.
In Information Security:
- Admission control deals with identifying which resources require protection, and which users (roles) are authorized to access the protected resources.
- Hallmark deals with verifying users' credential, i.eastward., ensuring the user is "who he said he is". User'due south credential is typically provided in the form of username/password and possibly IP address (hostname). Other means include biometrics (finger-impress, face recognition, retina) and digital certificates.
- Confidentiality deals with the encryption of the transmitted data over the network. This is often carried out via employing HTTP over SSL (Secure Socket Layer), known as HTTPS.
- Message Integrity ensures that messages are not tempered during transmission. This is washed via message assimilate or hash.
- Non-repudiation: If he/she has sent a bulletin, he/she cannot deny. This is done via digital certificate and public/individual keys.
Security tin be managed by the webapps themselves (chosen application-managed security) or via the Tomcat container (chosen container-managed security). In container-managed security, security is handled by the server. The server-side programs (servlets, JSPs) do not need any security-aware code. That is, the security control is totally transparent to the server-side programs. This section shall deal with container-managed security for access control and authentication.
In Tomcat, a user is identified via username/password. A user is assigned role(s) (east.g., managing director, admin, user, etc). Tomcat grants access for webapps to role(s), instead of individual users.
A realm is a collection of usernames/passwords and roles. Tomcat supports the following types of realms:
-
UserDatabaseRealm: kept in a XML file "conf\tomcat-users.xml", accessed via JDNI (Java Naming and Directory Interface). -
JDBCRealm: kept in a relational database such as MySQL, accessed via JDBC. - others:
JNDIRealm(uses LDAP directory),JAASRealm(Java Hallmark and Authorization Service).
You lot tin can used the <realm> element to configure a realm in "conf\server.xml". <realm> element can be placed in <engine>, <host>, or <context>, which determines the scope of the realm: all virtual hosts under the engine, a detail host, or a particular web application.
UserDatabaseRealm
UserDatabaseRealm stores user information in a XML file and accessed via JNDI (Coffee Naming and Directory Interface). Past default, the XML file is "<CATALINA_HOME>\conf\tomcat-users.xml". UserDatabaseRealm is loaded into memory from the specified file, and kept in retentiveness until Tomcat is shut down.
Tomcat provide a JSP example called "Course Authentication" (@ http://localhost:8080/examples/jsp/security/protected/index.jsp"), which uses UserDatabaseRealm. Allow us report this example. But before we become into the codes, let's look at the Tomcat'due south configurations.
"conf\server.xml"
You lot can specify the blazon of realm to be used via <Realm> element in server.xml. In this case, UserDatabaseRealm. The <Realm> is defined inside the <Engine> elements, and thus applicable to all the virtual hosts and webapps, under this server.
To specify the file used in UserDatabaseRealm, a JDNI resources named "UserDatabase" is divers, which maps to the file "conf\tomcat-users.xml".
<Server ...... > <GlobalNamingResources> <Resource name="UserDatabase" auth="Container" type="org.apache.catalina.UserDatabase" clarification="User database that can be updated and saved" factory="org.apache.catalina.users.MemoryUserDatabaseFactory" pathname="conf/tomcat-users.xml" /> </GlobalNamingResources> <Service name="Catalina"> <Engine proper noun="Catalina" defaultHost="localhost"> <Realm className="org.apache.catalina.realm.LockOutRealm"> <Realm className="org.apache.catalina.realm.UserDatabaseRealm" resourceName="UserDatabase" /> </Realm> <Host name="localhost" ...... ...... </Host> </Engine> </Service> </Server>
"conf\tomcat-users.xml"
Recall that a user is identified via username/password. A user is assigned role(s). Accesses for spider web applications are granted to part(s) instead of individual users. "Tomcat-users.xml" contains the following roles and username/password, but commented-out. Uncomment them for testing the example. Two roles, tomcat and role1, and three users, tomcat, role1 and both are defined.
<?xml version="one.0" encoding="ISO-8859-1" ?> <tomcat-users> <role rolename="tomcat" /> <office rolename="role1" /> <user username="tomcat" password="tomcat" roles="tomcat" /> <user username="both" password="tomcat" roles="tomcat,role1" /> <user username="role1" password="tomcat" roles="role1" /> </tomcat-users>
Accept note that the passwords are stored in clear text, which is non actually desirable.
" ContextRoot\WEB-INF\web.xml"
For Tomcat's webapp chosen "examples", the security roles are defined using <security-constraint> chemical element in "webapps\examples\WEB-INF\web.xml" as follows. The URL patterns /jsp/security/protected/* are accessible by users having roles of tomcat and role1 only.
<web-app ......> ...... <security-constraint> <display-proper name>Instance Security Constraint</brandish-name> <web-resource-drove> <web-resources-proper noun>Protected Area</spider web-resources-proper name> <url-pattern>/jsp/security/protected/*</url-pattern> <http-method>DELETE</http-method> <http-method>GET</http-method> <http-method>POST</http-method> <http-method>PUT</http-method> </web-resources-collection> <auth-constraint> <office-name>tomcat</role-name> <part-name>role1</office-proper noun> </auth-constraint> </security-constraint> <login-config> <auth-method>Course</auth-method> <realm-name>Example Form-Based Authentication Area</realm-name> <grade-login-config> <class-login-page>/jsp/security/protected/login.jsp</form-login-page> <course-mistake-page>/jsp/security/protected/error.jsp</form-mistake-page> </course-login-config> </login-config> <security-office> <role-proper name>role1</role-name> </security-role> <security-part> <role-name>tomcat</role-proper name> </security-part>
HTML Class-based Authentication Method
The instance uses HTML Course-based authentication method, divers in chemical element <login-config>. All accesses to the protected URLs (http://localhost:8080/examples/jsp/security/protected/*) will be redirected to the login.jsp folio (divers in <class-login-page>), which prompts user for the credential. For example, if a user requests for http://localhost:8080/examples/jsp/security/protected/index.jsp, the login.jsp volition be displayed.
The login.jsp page contain a html <form> (thus called FORM-based authentication):
<html> <caput><title>Login Page for Examples</title></head> <trunk> <form method="POST" action='<%= response.encodeURL("j_security_check") %>' > Username:<input blazon="text" name="j_username"> Countersign:<input type="password" name="j_password"> <input type="submit" value="Log In"> </form> </body> </html>
The login folio submits the username and password in parameters j_username and j_password to j_security_check. <input type="password" ...> is used for countersign text field, which displays the countersign equally *'s. The response.encodeURL(URL) encodes the URL j_security_check by including the session ID if URL-rewriting is used for session tracking; it returns the URL unchanged if cookie is used. For robust session tracking, all URLs emitted by server-side programs (servlet/JSP) should be run through this method.
If login fails, user volition be redirected to error.jsp page, as follows,
<html> <head><title>Error Folio For Examples</championship></head> <trunk> Invalid username and/or password, please try once more <a href='<%= response.encodeURL("alphabetize.jsp") %>'>once again</a>. </body> </html> If login succeeds, the user will get the page he requested for. Study the "examples\jsp\security\protected\index.jsp" source.
- To logoff, cease the electric current session via
session.invalidate(). - You can use
request.getRemoteUser()to get the authenticated login username;request.getUserPrincipal()to become ajava.security.Principalobject containing the proper name of the current authenticated user;request.isUserInRole(role)to check if the authenticated user is included in the specifiedrole.
HTTPS
In FORM-based authentication, the username/password are sent in clear text, and susceptible to eavesdropping. Hence, information technology is important to encrypt the transport past turning on SSL (HTTPS). Read "Tomcat with SSL" on how to setup Tomcat with SSL.
To enforce user to use secure transport (HTTPS), add a <transport-guarantee>CONFIDENTIAL</ship-guarantee>, inside the <security-constraint>, as follows:
<security-constraint> <display-name>Example Security Constraint</display-proper name> <web-resource-collection> <spider web-resource-name>Protected Expanse</web-resource-name> <url-pattern>/jsp/security/protected/*</url-pattern> ...... </spider web-resource-collection> <auth-constraint> <role-name>tomcat</role-proper name> ...... </auth-constraint> <user-data-constraint> <transport-guarantee>CONFIDENTIAL</transport-guarantee> </user-data-constraint> </security-constraint> All accesses to HTTP at port 8080 (due east.g., http://localhost:8080/examples/jsp/security/protected/index.jsp) will be redirected to HTTPS at port 8443 (e.g., https://localhost:8443/examples/jsp/security/protected/index.jsp).
HTTP Bones Authentication
HTTP defines 2 admission authentication schemes to request for username/password: Basic and Digest. Read "HTTP Authentication".
To apply BASIC hallmark, change the <login-config>'southward <auth-method> to BASIC.
<login-config> <auth-method>BASIC</auth-method> <realm-name>Basic Authentication Area</realm-name> </login-config> In Basic hallmark, Tomcat uses the HTTP Basic Authentication to ask for username and password. Attempt http://localhost:8080/examples/jsp/security/protected/index.jsp, you volition be prompted for username/password automatically. At that place is no redirect to login.jsp and no need to write the login.jsp.
Again, the HTTP Basic Authentication sends the username and password in clear text (countersign is encoded in Base64, but not encrypted). Information technology is totally insecure, unless you use a secure transport (HTTPS) or VPN (Virtual Private Network).
The Tomcat's webapp manager (nether webapps/manager) uses Basic authentication.
HTTP Assimilate Hallmark
To utilize Digest authentation, alter the <login-config>'due south <auth-method> to Assimilate. In DIGEST authentication, Tomcat uses HTTP Digest Authentication Scheme to enquire for username/countersign. Instead of sending password in clear text, the digest of password is send to the server. Although DIGEST hallmark is more secure than BASIC authentication, HTTPS is much more secure.
<login-config> <auth-method>DIGEST</auth-method> <realm-name>Assimilate Authentication Area</realm-proper name> </login-config> JDBCRealm
UserDatabaseRealm is not meant for serious production environment, equally it is hard to maintain. JDBCRealm is more advisable.
In JDBCRealm, user information is kept in a relational database, such as MySQL, accessed via JDBC, instead of an XML file. The information can be secured thruough proper database security.
Setting up Database
Nosotros shall prepare up our user database in MySQL. Read "How to Install MySQL and Go Started" if yous are new to MySQL.
The following script can be used to gear up up the user database. Ii tables are required: a users table containing username and password, and a user_roles containing username and the role assigned.
create database tomcat_users; use tomcat_users; create table users ( username varchar(fifteen) not null, password varchar(xv) not null, chief key (username) ); create table user_roles ( username varchar(15) not null, role varchar(15) not null, primary key (username, role) ); insert into users values ('tomcat', 'tomcat'), ('both', 'tomcat'), ('role1', 'tomcat'); insert into user_roles values ('tomcat', 'tomcat'), ('role1', 'role1'), ('both', 'tomcat'), ('both', 'role1'); JDBC Driver
Next, copy the MySQL's JDBC driver ("mysql-connector-java-five.i.{xx}-bin.jar") into Tomcat's lib ("<CATALINA_HOME>\lib"). Read "How to Install MySQL and Become Started"
"conf\server.xml"
Again, the realm is divers in server.xml via a <Realm> chemical element. In this instance, a JDBCRealm, with a connectionURL providing a MySQL database connexion.
<Realm className="org.apache.catalina.realm.JDBCRealm" driverName="com.mysql.jdbc.Driver" connectionURL="jdbc:mysql://localhost:{port}/tomcat_users" connectionName="{dbuser}" connectionPassword="{dbpassword}" userTable="users" userNameCol="username" userCredCol="countersign" userRoleTable="user_roles" roleNameCol="role" />
Supersede the {port} with your MySQL server port number, and {dbuser} and {dbpass} with an authorized MySQL username/countersign.
" ContextRoot\WEB-INF\web.xml"
Same as UserDatabaseRealm.
Authentication Methods
Same as UserDatabaseRealm, you can utilize FORM, Bones or Digest authentication method.
Testing
You need to get-go MySQL server earlier starting the Tomcat Server.
Unmarried Login
By default, each protected webapp would request for login during the first access. Y'all tin enable single login to all webapps under the host by uncommenting the unmarried-login valve, as follows:
<Host ......> <Valve className="org.apache.catalina.authenticator.SingleSignOn" /> </Host> Tomcat with SSL
SSL (Secure Socket Layer), allows web browsers and spider web servers to communicate over a secured (encrypted) connection. Tomcat provides built-in support for SSL.
Read:
- "SSL Configuration How-to" of Tomcat Documentation @ "
<CATALINA_HOME>\webapps\docs\ssl-howto.html". - "keytool - Key and Certificate Management Tool" @ JDK documentation.
The steps to plow on SSL back up are:
Step 1: Check your JDK version. Tomcat's SSL uses Java Secure Socket Extension (JSSE), which has been integrated into JDK since 1.4.
Step two: Set the Tomcat's server certificate, using the JDK's Cardinal and Certificate Management Tool chosen "keytool" (in "<JAVA_HOME>\bin" ), every bit follows:
> keytool > keytool -genkey -allonym tomcat -keyalg RSA -keystore {TOMCAT_HOME}\conf\.keystore Enter keystore password: xxxxxxxx Re-enter new password: xxxxxxxx What is your kickoff and last name? [Unknown]: What is the name of your organizational unit of measurement? [Unknown]: What is the name of your organization? [Unknown]: What is the name of your City or Locality? [Unknown]: What is the proper noun of your State or Province? [Unknown]: What is the two-letter of the alphabet state lawmaking for this unit? [Unknown]: Is CN=Unknown, OU=Unknown, O=Unknown, L=Unknown, ST=Unknown, C=Unknown right? [no]: y Enter fundamental password for <tomcat> (Render if aforementioned as keystore password): - The "
-genkey" selection is used to generate a public-private key pair. The public key is wrapped into an Ten.509 v1 self-signed certificate. The certificate and the private key are stored in a new keystore entry identified by the alias. In our case, the alias proper name must be "tomcat". - The "
-keyalg" option specifies the key generation algorithm. RSA public key algorithm is used in this case. - The "
-keystore" selection specifies the name and location of the key store file. - The password for allonym
tomcatmust be the same every bit the keystore (i.due east., hit enter for the concluding question).
Stride three: Enable SSL support for Tomcat. SSL is built into Tomcat. The Tomcat's configuration file commented out the SSL configuration directive. Uncomment them by removing the <!-- and --> around the SSL Coyote HTTP/1.1 Connector as follows:
<Connector port="8443" protocol="org.apache.coyote.http11.Http11Protocol" SSLEnabled="truthful" maxThreads="150" scheme="https" secure="true" clientAuth="false" sslProtocol="TLS" keystoreFile="{TOMCAT_HOME}\conf\.keystore" keystorePass="passwordOfKeyStore" /> Notation that the SSL (or HTTPS) is running on port 8443 instead of its default port number 443.
Add together in the keystoreFile and keyStorePass attributes. The keystoreFile attribute specified the location of the keystore file. The keyStorePass provides the password for accessing the keystore file.
Step 4: First your tomcat (run "<CATALINA_HOME>\bin\startup.bat"). After that, start a web browser and event an HTTPS asking as follows:
https://localhost:8443
Clustering
[TODO]
Configuring Virtual Hosts
To prepare a virtual host called "www.mytest.com" (suppose that yous take registered this hostname with at static IP address). Include the following <Host> element in server.xml nether the Engine Catalina:
<Engine name="Catalina" > <Host name="localhost .....> ...... </Host> <Host name="www.mytest.com" appBase="webapps_mytest.com" unpackWARs="true" autoDeploy="true" > <Alias>mytest.com</Alias> <Valve className="org.apache.catalina.valves.AccessLogValve" directory="logs" prefix="mytest.com_access_log." suffix=".log" pattern="%h %l %u %t "%r" %s %b" resolveHosts="faux" /> </Host> </Engine> The higher up lines configure a virtual host with hostname "www.mytest.com", with webapps base directory at "<CATALINA_HOME>\webapps_mytest.com". Nosotros also define a alias called "mytest.com". That is, this host can be accessed via http://www.mytest.com:port or http://mytest.com:port. We likewise ascertain a Valve, which intercepts the asking message to write a log entries (similar to localhost).
Next:
- Create a directory "
webapps_mytest.com" under<CATALINA_HOME>, according to theappBase. - Create a web application chosen
ROOT, by creating a directoryROOTunder the "webapps_mytest.com". Recall thatROOTwas configured with an empty cord URL. In other words,http://www.mytest.com:port/accesses theROOTapplication. - Create a directory "
www.mytest.com" under "conf\Catalina". - Write a welcome folio called "
index.html" and save information technology in "webapps_mytest.com\ROOT".<html> <head><title>Testing Virtual Host</championship></head> <torso> <h1>It's work on virtual host</h1> </body> </html>
To test the virtual host, without registering the hostname with an ISP, edit "C:\Windows\System32\drivers\etc\hosts" to include the post-obit lines (required administrative authority):
127.0.0.1 www.mytest.com 127.0.0.one mytest.com
These lines maps host names www.mytest.com and mytest.com to IP accost 127.0.0.1, which is the localhost. Every bit the IP software checks the host file before asking Domain Name Service (DNS) to resolve a host name, you willl exist able to test your virtual host.
Now, you lot are set up to test the virtual hosts. Start the Tomcat server and consequence these URL:
http://world wide web.mytest.com:8080 http://mytest.com:8080 http://www.mytest.com:8080/ http://mytest.com:8080/ http://world wide web.mytest.com:8080/alphabetize.html http://mytest.com:8080/alphabetize.html
Tomcat Host Manager for Clustering and Admin Roles
Reference: "Clustering/Session Replication HOW-TO" @ "webapps/docs/cluster-howto.html".
The Tomcat "host-manager" webapp allows you to manage Tomcat clusters. To admission host-manager, you demand to define a user with admin function.
The admin office has been separated out as admin-gui and admin-script, in Tomcat 7, as divers in webapps/host-manager/WEB-INF/web.xml.
The "Host Managing director" web application can be accessed via http://{host}:{port}/host-manager/html.
Performance Tuning
[TODO]
REFERENCES & RESOURCES
- Tomcat female parent site @ http://tomcat.apache.org
- Tomcat'south Documentation @ "
<CATALINA_HOME>\webapps\docs". - Coffee Servlet, JavaServer Pages (JSP), and JavaServer Faces (JSF) specifications.
Source: https://www3.ntu.edu.sg/home/ehchua/programming/howto/Tomcat_More.html
0 Response to "Apache Tomcat Allow Directory Browsing With File Upload Example"
Post a Comment